Current todos
I have two things on my plate at the moment regarding the “builder”.
a) display everything fine on a Vectrex
b) change the triggers/event things to:
- combine trigger sources with AND
- allow multiple results on a “true” condition
Display
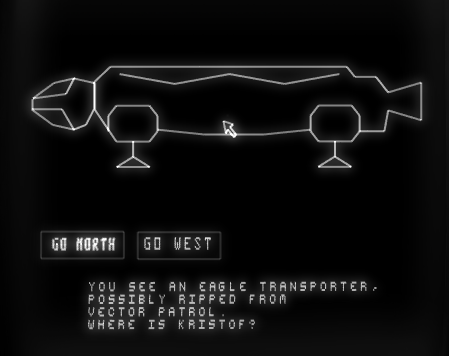
For the last blog entry about the builder I had not done anything special for the display.
I just went with what I had and displayed everything with VB-Smartlists (Vectorblade Smartlists).
As it turned out – that looked HORRIBLE on a real vectrex. The smartlists are really fast, but the vectorlists have to be created really carefully so as not to produce deformed results.
Since I wanted to change things slightly anyway, I produced a whole new set of smartlists.
No wait – they are generated by Vide as needed – so you never have more – or less – functions in your
sources than needed. I finished this yesterday – although I must state – I don’t know why they work as they do. It was a huge trial and error thing – and only tested on a single vectrex, I hope it works as well on other Vectrex.
The new routines are a bit slower than VB SM (they need about 1/6 more time… a sample list e.g.
that needs about 3150 cycles in VB SM now needs about 3550 cycles) – but they seem to be much more
stable so I’ll go with it.
There is one drawback to using smartlists (as I use them). If you want to do everything with them…
bigger lists just NEED a calibration. I am not really a fan of calibrating every game I play, especially
not if you can not save the settings…
So for games that do not have a massive “object”-count – I will offer to use synclists as well.
This is not implemented yet – but I’ll do that shortly.
There is also another drawback, that synclists can counter – that is scalability.
Smartlists vector sprites are NOT scaleable. But for some effects (at least) scaling is nice and a
thing the vectrex is uniquely suited for – to abandon scaling entirely is not good.
So in the end there will be two kinds of vector objects:
- smartdraw objects
- synced objects
Events/Triggers
Yea well. I thought about this a lot.
The input to more extended events is way more complex – but I think in order to be as flexible as I would like to be – there is no way around this.
What is this about?
Within the builder you can configure events. As of now these are implemented like:
if something happens -> than do something
e.g.
if positionY > 100, than destroy sprite (a shot disappearing at the edge of the screen)
What I want is something like:
if one thing happens, and at the same time another thing -> than do something, and do another thing, and yet another thing
e.g.
if collision with a sprite happened AND sprite positionY > 100 than destroy sprite, and award 100 points and play a sound
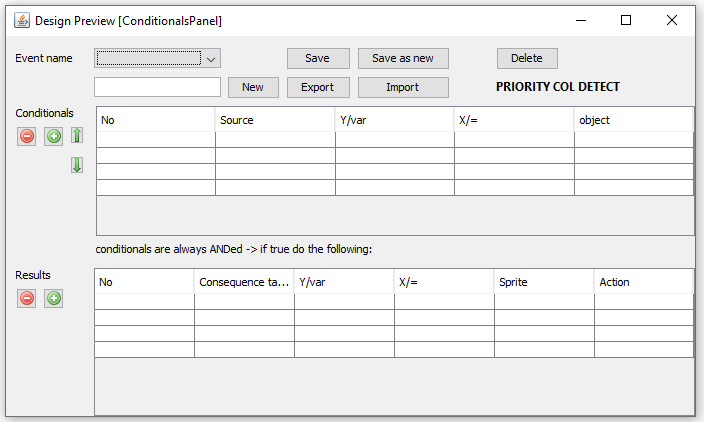
I have to implement the events so that the conditions can be ANDed (OR is just an additional condition), and that multiple different results can happen to one (possibly combined) condition.
This does not sound to complicated, but it is a change in the internal structure, and I have to think about how to present the user this kind of flexible input. This very fast can look very complicated.
I have a draft in mind (and in powerpoint) – but it is more like “yes it works – but that is about all”.
Inner workings
A few words how the built games run.
Game loop
This is the main loop of the game. It will probably slightly change/vary between each game – but the currently implemented stages are all there.
- Input stuff
This is digital or analog joystick query – depending on the game/level configuration - Sound stuff
The sfx and music is initiated at other places – but the playback is done here.
If music is played at all than it is first – after that sfx effects, which can overwrite music channels and are thus played “in front” of the music - Wait Recal
Synchronize the game to a game frequency and perhaps recalibrate. The BIOS function will probably be replaced with a customized version later on - Animation counter
As of now all animations in game are done with exactly ONE animation delay. This saves counters (RAM space). - Brightness
As default set some brightness (this is probably subject to change) - Background scenes
If configured – background scenes are drawn (no collision detection) – these are drawn outside the object loop - Objects
All other “things” in game are objects. Sprites, Text, Events etc – more on this further down.
Objects
One of the key ressources in Vectrex development is RAM. The count of objects on screen and other actions depends on the good usage of RAM.
As in development of Vectorblade (and befor Release), game objects are organized in a one way linked list.
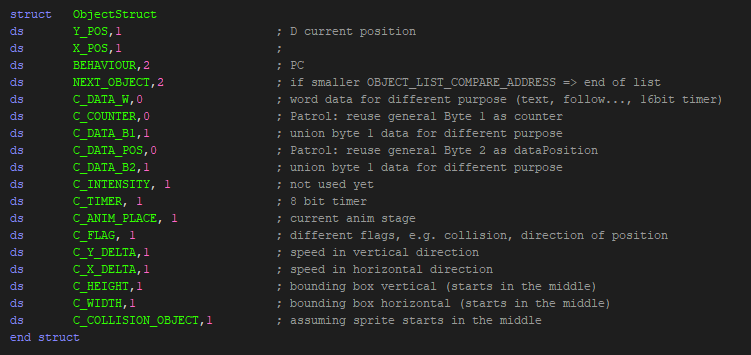
Above you see the current object structure (this may still be subject to change). As of now the structur uses 17 bytes – and is used for ALL kind of objects.
There are pros and cons to using just one object structure – but as of now I think my own personal “pro” wins. If I am not utterly mistaken this will probably allow up to 45 objects at any one time – this is not Robotron – but still quite a lot (but including also shots of any kind).
I am undecided – whether I will allow this structure to be flexible. Flexible as in – if a game does not use e.g. “INTENSITY” – then the intensity data will be removed from the structure and thus give space for another 3 objects (or so).
There are MUST fields in the structure , as of now these are BEHAVIOUR and NEXT_OBJECT. All other fields may or may not be used/set, depending on the type of object.
Every displayable object e.g. has Y_POS and X_POS set – but there are “dummy objects” (which only serve as a trigger – e.g. a timer to activate an event), which do not even need a position.
An object in general consists of two parts:
- the RAM structure as shown above
- the BEHAVIOUR (more on that further down)
RAM structure
The name of the fields as given in the objects structure are “mostly” accurate. However, since there are many types of events/behaviours possible, some fields are reused. Most notable of these are the 2 general purpose bytes:
- DATA_W
- which is a “union” of DATA_B1 and DATA_B2
Depending on the purpose of the object – these are used as one 16bit value or two 8bit values, e.g.:
- for text objects DATA_W contains the 16bit address of the text which is to be displayed
- for a 16bit timer DATA_W contains the timer value
- for a “patrol enemy”, DATA_B1 contains the counter of changes for the patrol
- for a “patrol enemy”, DATA_B2 contains the position in the patrol coordinates
- …
The double usage of this field implies certain restriction on object usage. You can directly derive, that a text object can not be set to be on “patrol duty” (however, even with the current not to flexible event handling you can simulate that as well – you just have to think a little around the corner).
BEHAVIOUR
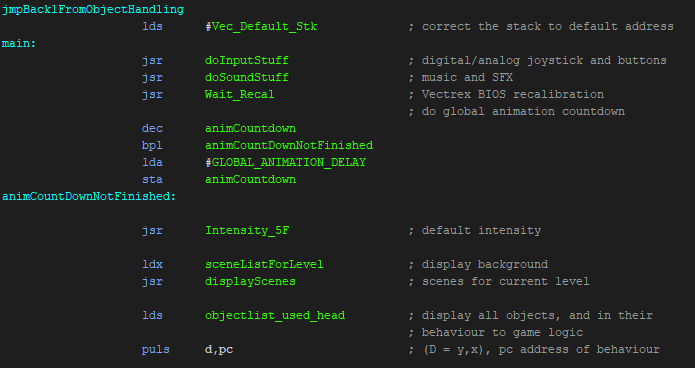
The second part of an object definition is the BEHAVIOUR, which in the above fields is represented in a function pointer. When an object is “called” – the program automatically jumps to its behaviour
“puls d,pc“;
At this point I would like to mention, that each object can have many different behaviours. The behaviour “switches” during the ongoing game to the one that is currently desired. Usually the behaviour switch originates in a change of actions within a sprite. To achieve such a switch – you only need to exchange the function pointer in the above described object structure.
General structur of a (sprite object) BEHAVIOUR:
- start the move to the location the display is expected (the coordinates are set in D with the last “puls”
- if applicable: change animation
- if applicable: change position according to currently set delta values
- loop
- if applicable: test conditions
- -> if true execute trigger code
- -> if not loop (or exit loop on last conditional)
- if trigger code did not “leave” the object…
- load the current vectorlist
- end the move to
- draw the object -> jumps automatically to the next objects, or to start of the main loop
Since a behaviour can have heaps of conditional tests – the generated code looks very convoluted. But usually only one trigger is triggered – and the rest of the tests are then really only a “compare -> branch”, which does not take very long.
The code generation is not especially optimized for size here. I used to reuse trigger code but as of now I disabled this (e.g. if you implement different movement directions with actions, than each of the triggered actions are generated many times:
– the center action upon a joystick left triggers a: go left
– the up action upon a joystick left triggers a: go left
– etc
This can be optimized for the “go left” to be implemented only once – and in all other actions do a jump.
But with the ability of conditionals to have more than one result – this gets really complicated to sort out. Since not all “paths” of the same trigger may have all the same following results).
The two words “test conditions” in the above enumeration hides amongst other the “collision detection”…
Collision Detection
Theoretically this is really easy. It uses the same principle as the BIOS function Obj_Hit (see: OBJ_HIT). But I even made it simpler (more efficient). For each object I define a “bounding box” – a rectangle that defines the hitbox of the object. Per default the builder generates a bounding box from the sprites vectorlist – but you can influence the bounding box with offsets – or define one completly yourself.
The result are two values:
- horizontal delta
- vertical delta
It is assumed, that each and every objects stars in the center of its bounding box! Than one delta to the left – the left border is reached, one delta to the right – the right border is reached. And also one delta to the top – the top border is reached, one delta to the bottom – the bottom border is reached.
If you do that with all objects that can hit each other, the test is really straight forward – but you still have to ensure three things:
- the scale of both objects is the same
- the moveTo scale of both objects is the same
- … and what I said before … the sprites always start in the center
The actual code in assembler is straight forward – but looks again a bit convoluted – there are things one has to respect – like absolut values (if negative than NEG) … and such – which looks (and is) cumbersome.
But still – the code is very fast.
Also – with only one small addition test – I can determine (with some accuracy) from which direction the sprite was hit!
This is not self evident! Since for a hit to occur the overlapping of two objects must occur both horizontally and vertically – how do you chose from which direction you were hit?
Anyway – collision detection (if requested for a trigger) is done each round (I may change that in the future to alternate rounds… – for further optimization) for each collision.
Note:
If sprite1 has a collision event with sprite2 – and sprite2 also has a collision event with sprite1 – than this is tested only once!
Each sprite that is part of a collision gets notified:
- in the object list a FLAG is set (SPRITE_COLLISION)
- in each object list a flag is set (from the view of the object), where the collision occured (NORTH, SOUTH, WEST, EAST)
- in each object list the ID of the collision opponent is set to COLLISION_OBJECT
Note:
If a sprite has more than one collision per round – than the last occured collision wins!
The direction of the collision is necessary e.g. for the trigger: “block movement” – you HAVE to know which direction you must block – otherwise the sprite would not be able to move “back”.
Three kinds of collisions
As with many other things – I tried to optimize collision detection. For that reason 3 different types of collision exists in the builder (internally).
- player1 <-> player2 collision
- playerx <-> any non playery collision
- collision of non player sprites
The thought behind that is – that player objects have much todo anyway (like reacting on joystick input, collisions with many objects on screen etc).
If not absolutely needed (player vs player) – a player sprite never actually does a collision check – it only tests its flags. If in a player object a collision with a sprite is configured – than that other sprite executes the actual collision detection algorythm – and after finishing – notifies the player, if needed.
That way many collision detections are distributed amongs all opposing sprites (into their MoveTo– idle time). If player vs player collision detection is needed – than player one is the one to handle it.
Non player versus non player collision detection is done by the first one that has it configured – but only that one – the other non player also only receives the results.
I’ll probably talk about events and triggers in the next blog entry in more depth – after (re) implementing them.
Great idea. I’m curious to see what “programming” a game in Game Maker will look like.